

 Team Paracord.eu
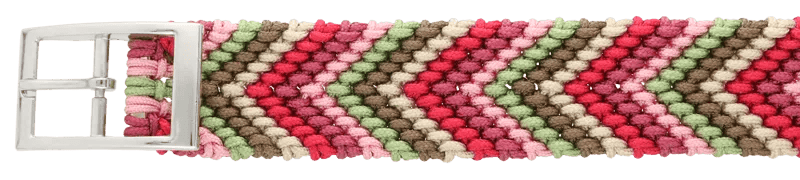
We are seeing more and more the friendship bracelets, made of Paracord Type I or micro cord, being processed into dog collars. These collars look beautiful, but how do you turn this pattern for a friendship bracelet into a version for dog collars? Here is a modified version of the Chevron pattern with a full video tutorial on making the collar.
The Chevron is one of the most well-known patterns in the world of friendship bracelets, typically made with thin yarn to create various designs. In this tutorial, we use Paracord Type I and start the collar with the safe set-up Kosmetik 2.0.
Length of the set-up
In this tutorial, Paracord Type I is used. Use the MatchMaker tool to create fun combinations. Using the length calculator in the MatchMaker, you can easily calculate how much type I cord you need for your project. Please note that the length and MT codes are shown in Type III! The required length remains about the same in Type I.
If you want to use micro cord, it's useful to make a sampler beforehand so you know how much cord you'll need. If you tie the Chevron with six colours of Paracord Type I, your knotwork will be about 0.8 cm thick and 3.5 cm wide.
These materials are used in the tutorial (for a setup length of 20 cm):
- Colour 1: Red Velvet Type I (2.3 m)
- Colour 2: Holy Guacamole Type I (2.3 m)
- Colour 3: Pastel Pink Type I (2.3 m)
- Colour 4: Viva La Vino Type I (2.6 m)
- Colour 5: Hazelnut Brown Type I (2.3 m)
- Colour 6: Cafè Latte Type I (2.3 m)
Grundlegende Makramee-Knoten
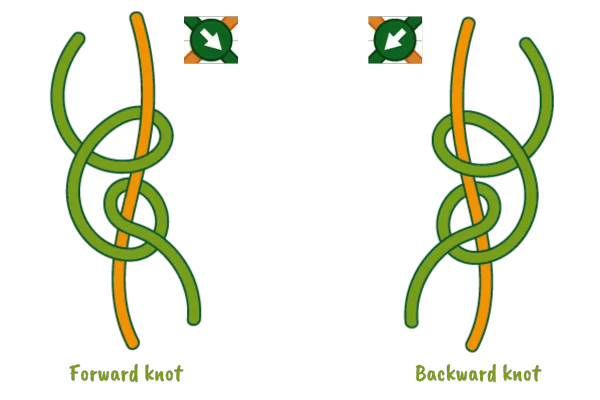
There are four basic knots you can use to make almost all friendship bracelet patterns. For this particular pattern, you only need two of these: the Forward knot and the Backward knot. The Forward knot goes from left to right and the Backward knot goes from right to left. If the arrow in the pattern points to the right, you make a Forward knot. When the arrow in the pattern points to the left, you make a Backward knot.
Chevron Video Tutorial
Related Articles
Knot the Cookies Pie | Tutorial
In this photo tutorial, you will see how to knot the Cookie’s Pie pattern. The Cookies Pie was designed by Silke Engels and is hard to make.
Which Paracord Colours Actually Glow Under Blacklight?
Not every neon paracord colour reacts to a blacklight or is glow in the dark, despite what most people assume. Neon just means the colour is bright. Whether it actually glows in the dark or under UV light comes down to the dye used, and only a handful of our colours are made with that specific fluorescent or phosphorescent dye.
Make your own handsfree dog leash | DIY kit instructions
With our tutorial, you can easily make your own hands-free dog leash. With this 3-meter leash, you can walk your dog in peace while keeping your hands free! Isn’t that ideal? This way, you can take beautiful photos of nature or quickly send a message to a friend. In this blog, you'll find everything you need to follow our tutorial.
Make the Niki's Butterfly knot | Tutorial
In this photo tutorial, you will see how to knot the Niki's Butterfly pattern. The Daylight knot was designed by Nicole Damer and is easy to make.
2 x Bag charm inspiration
We couldn’t resist the cute bag charm trend. Make your own leather bag charm with our kangaroo or nappa leather. Follow our tutorials and create your custom key ring bag charm!
Make the Daylight knot | Tutorial
In this photo tutorial, you will see how to knot the Daylight pattern. The Daylight knot was designed by Silke Engels and is of an intermediate level.