

Table of Contents
- How to measure your dog's neck
- 1. Measure the neck at the place where the collar will naturally stay on
- 2. Measure while the dog is sitting
- 3. Use a flexible, thin measuring tape
- 4. Make sure the tape measure is against to the skin, but can still slide
- 5. Read off the correct value
- Thickness of the collar
- Size of the collar closure
- Check the length of your collar


 Team Paracord.eu
Before you can start making your own dog collar, you must first know the size of the dog's neck. But what is the best way to measure this? And how do you make sure that the collar will actually be this size?
How to measure your dog's neck
Below are the 5 steps for measuring a dog's neck.
1. Measure the neck at the place where the collar will naturally stay on
Dog necks can be very different from each other. You measure specifically for your dog in the place where his collar will naturally stay on, without the collar interfering with his breathing or movement.
2. Measure while the dog is sitting
You will get different measurement results depending on the position of the dog. We recommend that the dog is seated while measuring, as this is between the position of standing and lying down. Standing also allows the dog to move more, which can make measuring more difficult.
3. Use a flexible, thin measuring tape
You could also use a string and ruler or a tape measure. However, it is difficult to measure a round, uneven surface such as a neck with these tools and the chance of getting the wrong measurements is therefore higher. So make sure you work very accurately if you use such tools instead of a tape measure.
4. Make sure the tape measure is against to the skin, but can still slide
Tighten the measuring tape so that it touches the skin. Then make sure that the measuring tape is loose enough so that the tape can still slide effortlessly over the skin. With a dog with a lot of hair, this will be a little more difficult than for a dog with little hair.
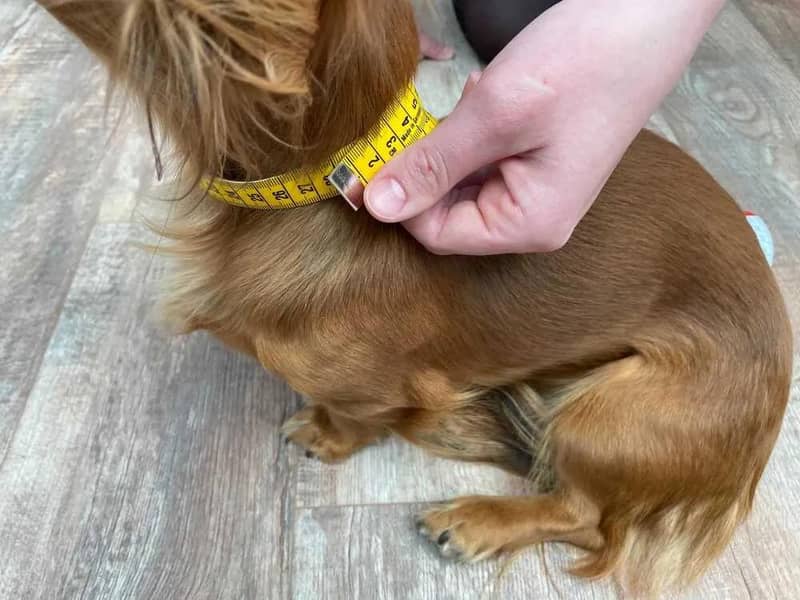
5. Read off the correct value
If necessary, you can compare this value with the original collar. But pay attention to how you measure: the flat length and the circumference of the band are different lengths. Read here how to best measure a dog collar.
Thickness of the collar
Now that you have the correct size, you need to make sure that the collar will actually be this size. The thickness of the knot and the type of closure are important factors here.
The thickness of the knot is perhaps the most important variable.This thickness varies from knot to knot. 'Benno's Happiness' is for example 12 mm thick, while 'Snakes Alive 4 Colors' is on average only 7 mm thick. It can also vary from person to person. This thickness affects the total length you need to tie.
How can you take all this into account? Here you can read more about the effect of the knot thickness and fortunately there is also a jig formula that can help you with this.
Size of the collar closure
The type of closure, and in particular the size of the closure, also plays a role. When you choose an AluMax buckle, you are working with a rather thick buckle. Do you prefer an adjustable Biothane adapter that is very thin? Then you need to take this into account as well.
The most important dimension to take into account is the length of the closure, which you must subtract from the total length of the collar to find out what length you need to tie.
Check the length of your collar
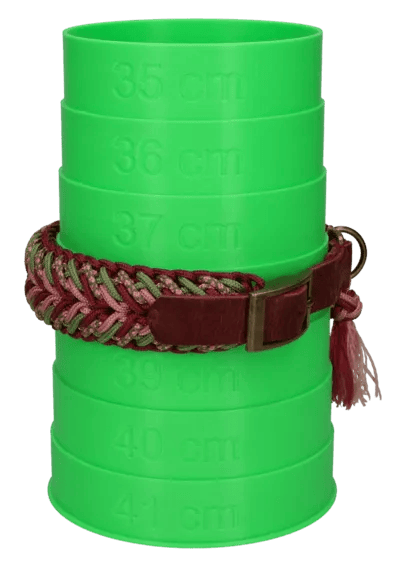
Now we take a leap forward. After you have knotted the collar and are ready to finish it off, you can check the length again, just to be sure.
Of course you do this preferably before you have completed the collar, so that you can still adjust something if necessary. A tape measure or a measuring tower are handy instruments here.
Close the collar and place the measuring tape tightly along the inside of the collar. In this way you measure the collar where it is smallest. If you use the measuring tower, this works the same as the conical shaped tool at a jeweller's which you can use to measure a ring size.
You slide the collar over the tower and the collar will automatically stop on an edge. The number indicated on that edge is the inside size of the collar in centimetres.
The collar doesn't have the right size? Here you will find common collar size problems and solutions, see if this helps you too!
Related Articles
What kind of rope do I need for my horse?
Would you like to make your own horse accessories out of rope, such as a unique horse halter, but aren’t sure what you need? In this blog, we’ll give you advice on what kind of rope to use for different parts of your horse gear.
Make your own handsfree dog leash | DIY kit instructions
With our tutorial, you can easily make your own hands-free dog leash. With this 3-meter leash, you can walk your dog in peace while keeping your hands free! Isn’t that ideal? This way, you can take beautiful photos of nature or quickly send a message to a friend. In this blog, you'll find everything you need to follow our tutorial.
Make the Niki's Butterfly knot | Tutorial
In this photo tutorial, you will see how to knot the Niki's Butterfly pattern. The Daylight knot was designed by Nicole Damer and is easy to make.
2 x Bag charm inspiration
We couldn’t resist the cute bag charm trend. Make your own leather bag charm with our kangaroo or nappa leather. Follow our tutorials and create your custom key ring bag charm!
Make the Luna’s Caramella | Tutorial
In this photo tutorial, you will see how to knot the Luna’s Caramella pattern. The Luna’s Caramella knot was designed by Saskia Meißner and is of intermediate level.
Make a BioThane dog leash with paracord | DIY kit instructions
Want to make your own colourful dog leash from BioThane and paracord? BioThane is a strong, water-resistant and easy-to-clean material - ideal for a dog leash! In this blog, we explain step by step how to make your own leash. Using a clear pattern, you can easily determine the right size of the handle and mark the holes in the right place.